|
Home
Albums
Propagation
With Cuttings
By Grafting
Marcotting
From Seeds
Q and A
History
Ross Gast Letters
Species
Culture
Pests and Diseases
Nurseries
Societies
Message Boards
Sites to Visit
Nomenclature
Photography
Site Map
|
[I have deleted sections of this article not relevant to hibiscus but the whole
article can be read by using the site link directly: http://www.ces.ncsu.edu/depts/hort/hil/hil-8701.html
]
Plant Propagation by Layering: Instructions for the
Home Gardener
1/99 HIL-8701
Erv Evans, Extension Associate
Frank A. Blazich,
Professor
Department of Horticultural Science
Stems that are still attached to their parent plant may form roots where they
come in contact with a rooting medium. This method of vegetative propagation is
generally successful, because water stress is minimized and carbohydrate and
mineral nutrient levels are high. The development of roots on a stem while the
stem is still attached to the parent plant is called layering. A layer is
the rooted stem following detachment (removal) from the parent plant.
Some plants propagate naturally by layering, but sometimes plant propagators
assist the process. Layering is enhanced by wounding the stem where the roots
are to form. The rooting medium should always provide aeration and a constant
supply of moisture.
Types of Layering
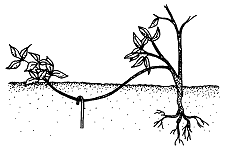
Simple layering can be accomplished by bending a low growing, flexible
stem to the ground. Cover part of it with soil, leaving the remaining 6 to 12
inches above the soil. Bend the tip into a vertical position and stake in place
(Figure 1). The sharp bend will often induce rooting, but wounding the lower
side of the bent branch may help also. Simple layering can be done on most
plants with low-growing branches. Examples of plants propagated by simple
layering include climbing roses, forsythia, rhododendron, honeysuckle, boxwood,
azalea, and wax myrtle.

Figure 1.
Simple layering can be done in early spring using a dormant branch, or in
late summer using a mature branch. Periodically check for adequate moisture and
for the formation of roots. It may take one or more seasons before the layer is
ready to be removed for transplanting.
Tip layering
Compound (serpentine) layering
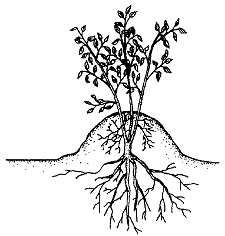
Mound (stool) layering is useful with heavy-stemmed, closely branched
shrubs and rootstocks of tree fruits. Cut the plant back to 1 inch above the
soil surface in the dormant season. Dormant buds will produce new shoots in the
spring. Mound soil over the new shoots as they grow (Figure 4). Roots will
develop at the bases of the young shoots. Remove the layers in the dormant
season. Mound layering works well on apple rootstocks, spirea, quince, daphne,
magnolia, and cotoneaster.

Figure 4.
Air layering can be used to propagate large, overgrown house plants
such as rubber plant, croton, or dieffenbachia that have lost most of their
lower leaves. Woody ornamentals such as azalea, camellia, magnolia, oleander,
and holly can also be propagated by air layering. For optimum rooting, make air
layers in the spring on shoots produced during the previous season or in mid to
late summer on shoots from the current seasonís growth. For woody plants, stems
of pencil size diameter or larger are best. Choose an area just below a node and
remove leaves and twigs on the stem 3 to 4 inches above and below this point.
This is normally done on a stem about 1 foot from the tip.
Air layering differs, depending on whether the plant is a monocot or a dicot.
For monocots, make an upward 1- to 1 1/2-inch cut about one-third through the
stem. The cut is held open with a toothpick or wooden match stick. Surround the
wound with moist, unmilled sphagnum moss (about a handful) that has been soaked
in water and squeezed to remove excess moisture. Wrap the moss with plastic and
hold in place with twist ties or electricianís tape. No moss should extend
beyond the ends of the plastic. Fasten each end of the plastic securely, to
retain moisture and to prevent water from entering. If exposed to the sun, the
plastic should be covered. Aluminum foil can also be used, as it does not
require twist ties or tape to hold it in place.
The process for dicots is similar, except a 1-inch ring of bark is removed
from the stem. With a sharp knife, make two parallel cuts about an inch apart
around the stem and through the bark and cambium layer (Figure 5). Connect the
two parallel cuts with one long cut. Remove the ring of bark, leaving the inner
woody tissue exposed. Scrape the newly bared ring to remove the cambial tissue
to prevent a bridge of callus tissue from forming. Application of a
root-promoting substance to the exposed wound is sometimes beneficial. Wrap and
cover using the same procedure as that described for monocots.

Figure 5.
After the rooting medium is filled with roots, sever the stem below the
medium and pot the layer. The new plant will usually require some pampering
until the root system becomes more developed. Provide shade and adequate
moisture until the plant is well established.
Natural Forms of Layering
For Further Reading
- Bryant, G. 1995. Propagation Handbook. Stackpole Books:
Mechanicsburg, Pennsylvania.
- Dirr, M. A. and C. W. Heuser, Jr. 1987. The Reference Manual of Woody
Plant Propagation: From Seed to Tissue Culture. Varsity Press: Athens,
Georgia.
- Hartmann, H. T., D. E. Kester, F. T. Davies and R. L. Geneve. 1996.
Plant Propagation, Principles and Practices. 6th ed. Prentice Hall:
Upper Saddle River, New Jersey.
- McMillan Browse, P. D. A. 1978. Plant Propagation. Simon and
Schuster: New York.
- Toogood, A. 1993. Plant Propagation Made Easy. Timber Press:
Portland, Oregon.
Published by
North Carolina Cooperative Extension Service
|
|