Hibiscus Propagation
 More Information?  Questions?  Email me!ganmor@hotkey.net.au

Home
Albums
Propagation
  With Cuttings
  By Grafting
  Marcotting
  From Seeds

Using a hotbed
Propagation (French)
  Cuttings (French)
   Grafting (French)
   Hotbed (French)

Q and A
History
  Ross Gast Letters
Species
Culture
Pests and Diseases
Nurseries
Societies
Message Boards
Sites to Visit
Nomenclature
Photography
Site Map


GRAFTING TECHNIQUES
This tutorial was made a few years back - I've just edited it for this web site until I can revise it one day. (See the Top Grafter 
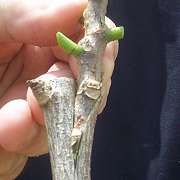
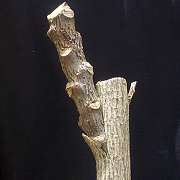
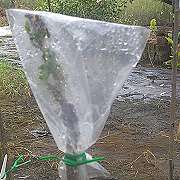
grafting plier on Jim Raggett's site)
                 Step by step in Pictures!
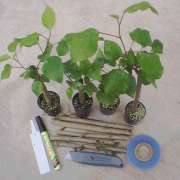
 

GRAFTING is just a method to connect the sap-flow of the rootstock to that of the scion and it doesn't need much. I've seen all sorts of funny results with only a fraction of the cambium sap layers making connection but the plant still thrives. Of course, the "expert" will boast about getting the rootstock and the scion to line up just about everywhere. I remember my early grafts when I labelled some as "unlikely", others as "certain" and I can assure you the results were often the other way round.

There are many other grafting methods even as simple as just clefting the top. The cambium connection is all that matters. Some are more aesthetic in appearance than others, but if it's just for yourself, it doesn't matter what type you use.

A humidity hat is important if you don't have a humid igloo-type room. Two weeks is about all the hat needs to be on and the tape can be removed from 4 to 6 weeks according to whether it's warmed up or not. Any remaining eyes on the rootstock are then removed as well.

See also how to recycle a failed graft - even using another method, the whip-and-tongue graft.

Plastic bag hat is important for about two weeks Side graft on a broom stick standard. Insert helps show union. Wedge graft on a standard. Insert is supposed to help!! Rind or bark graft showing one on each side of pole.